Best Practices
Level: Intermediate | Audience: Composer, technician, student, studio user.
Use this page when you already know the basic setup and want working habits that reduce routing errors, monitoring problems, and export mistakes.
Short, reliable rules for stable Ambisonics sessions in REAPER: clean routing, repeatable decoder setups, and less troubleshooting before recording, rehearsal, or export.
1. Set the session baseline first
Before adding sources, establish the session structure. Retrofitting routing later is a reliable source of errors.
Choose your HOA order first. The order determines both spatial resolution and channel count, and it cannot be changed without rebuilding the session.
As a rough guide: 1st order (4 ch) for basic archiving or small setups, 3rd order (16 ch) for most studio and concert work, and 5th order (36 ch) or 7th order (64 ch) for large-scale installations or maximum resolution.
Match the order to your speaker array. Decoding high-order B-format to a low-density array gives no audible benefit.

Core session logic: build one clear signal path from source to B-format bus to decoder, then keep speaker and headphone monitoring as intentional branches.
- Set all Ambisonics-relevant tracks to
64channels by default. HOA7 requires exactly 64 channels; lower orders use fewer, but 64 as a uniform setting ensures no channel is silently dropped when routing between tracks. - Define the signal chain early and clearly:
Source → HOA Bus → Decoder. - Save working setups as project or track templates so you start from a known state every time.
2. Keep routing disciplined
Routing errors in Ambisonics sessions are often invisible until playback reveals wrong speaker assignments or phase collapse.
- Avoid accidental direct source-to-master paths — all sources should feed through the HOA bus.
- Name source tracks, the HOA bus, and the decoder clearly and consistently.
- Check routing immediately after adding each new source or bus track.
- Keep gain staging clean: set source track levels so the HOA bus does not clip. Avoid compensating for low gain at the decoder output — fix it at the source. The B-format field carries spatial information in its amplitude ratios, so unexpected gain changes anywhere in the chain can distort the perceived image.
3. Standardize decoder practice
The decoder translates the B-format field into loudspeaker signals. A mismatch between preset and real hardware is the single most common cause of wrong localization.

Use the same B-format master for both listening paths, but keep loudspeaker and binaural monitoring operationally separate.
- Always load the preset that matches the real loudspeaker setup before listening or recording.
- Verify speaker order with the decoder test function after loading a new preset.
- Keep loudspeaker monitoring and binaural monitoring separated. Route the HOA bus to the decoder for speaker playback and to a separate binaural decoder such as IEM BinauralDecoder or SPARTA for headphone monitoring. Never let both run in parallel unintentionally.
For complex setups with height layers or separate subgroups, use the ICST MultiDecoder.
It runs up to four independent decoder units on the same B-format input.
Name each unit clearly by its zone, for example Mid Ring, Top Layer, or Sub.
Template reference
The current ICST default template already embodies most of these rules in practice: one central B-format path, separate monitoring branches, and a clear distinction between source, bus, and decoder layers.
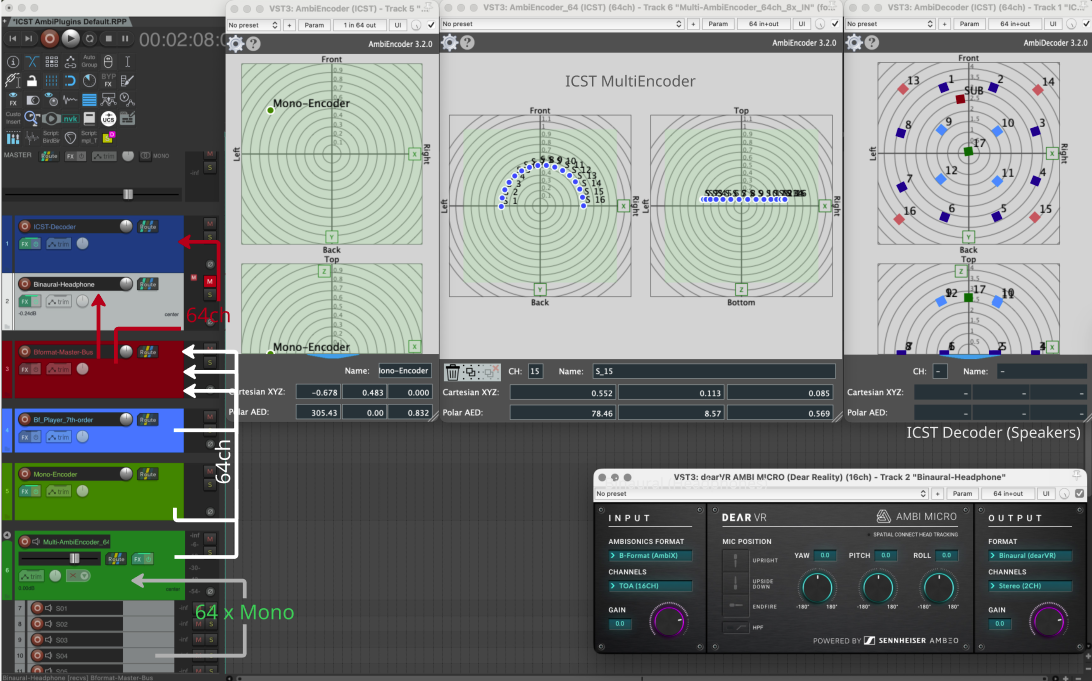
Real REAPER example from the ICST default template. Use it as a practical reference for source tracks, the B-format master, the decoder, and the separate binaural path.
4. Do not skip monitoring and verification
A quick signal check at the start of each session prevents problems that are much harder to diagnose after recording.
- Start every session with a single mono test source on a known encoder position.
- Briefly verify movement, level, and speaker assignment before working.
- Run a short 30-second signal check before recording or export, especially after loading a preset, changing the speaker setup, or reopening a project.
- If the production will also be delivered in stereo or mono, run a brief downmix check: fold the B-format to mono or stereo and verify that the most important sources remain audible and correctly positioned. Phase cancellations can collapse spatial elements that sounded clear on the full array.
5. Export and rendering
Export discipline prevents format confusion when delivering files to other systems, studios, or archiving.
- Export B-format from the Bformat Master track in solo, not from the decoder output.
- Use 48,000 Hz sample rate and 64-channel multichannel WAV (Wave/RF64 for large files).
- Set channel count to match your HOA order: 4 ch (FOA/1st order), 9 ch (2nd order), 16 ch (3rd order), up to 64 ch (7th order).
- Use the ambiX convention (ACN channel ordering, SN3D normalisation) unless your target pipeline requires FuMa.
- Use a consistent filename that documents order and take:
scene01_O5_take03.wav. - Document the export format and channel ordering in a session notes file alongside the rendered material.
REAPER rendering guide
For the full export sequence, channel-count reference, and reusable REAPER metadata note, see Render B-Format in REAPER.
6. Maintain project hygiene
A session that is easy to hand over is also a session that is easy to reopen six months later.
- Use consistent track names and clear bus labels throughout.
- Document decoder presets, OSC port assignments, and export formats in a text file or the REAPER project notes. For OSC specifically: note the port numbers, the IP address of each controller, and the message namespace used. OSC setups are invisible in the REAPER project file and easy to forget between sessions.
- Save important session states as numbered versions instead of only overwriting:
project_v01.rpp,project_v02.rpp. - For sessions with many encoders or high HOA order, freeze source tracks after recording to reduce CPU load during mixing and playback.
7. Common failure points
- One track in the HOA path is not set to
64channels. - The decoder preset does not match the real loudspeaker routing.
- The
Source → HOA Bus → Decoderchain is broken somewhere. - Loudspeaker and headphone monitoring run in parallel unintentionally.
- OSC ports do not match between REAPER, external controllers, or helper tools.
- Export was rendered from the decoder output instead of the B-format master.
- ambiX and FuMa channel ordering mixed up between production and delivery.
8. Recommended order for new setups

Treat setup as a sequence, not as parallel experimentation. Most avoidable errors happen when steps 4–6 are started before steps 1–3 are stable.
- Verify that all Ambisonics-relevant tracks are set to the correct channel count for your HOA order.
- Create the HOA bus and decoder structure.
- Insert one source and test the routing end-to-end.
- Load the decoder preset for the loudspeaker setup and verify speaker order.
- Set up the binaural monitoring path separately.
- Only then expand into automation, recording, or rendering.