ICST Ambi Motion Map — User Guide
Level: Beginner–Intermediate | Audience: Composer, sound designer, spatial-audio technician. | Version: v2.1
The Motion Map GUI generates algorithmic spatial movement for up to 64 AmbiEncoder sources and writes it as REAPER automation in one click. This guide walks you through every feature from first launch to advanced techniques.
Download: ICST Ambi Motion Map Bundle (GUI script + automation writer, both required)
1. Requirements
Before you start, make sure you have:
- REAPER v6 or later
- ICST AmbiEncoder_64 on the target track (see Installation)
- Python 3 installed — required only for the live OSC preview feature
- Both script files in the same folder:
JS_AmbiEncoder64_Motion_Map_GUI.luaandJS_Write_AmbiEncoder64_Spat_Motion_Automation.lua
2. Installation
Step 1 — Download the bundle
Download the ICST Ambi Motion Map Bundle and unzip it. Keep both Lua files together in one folder (e.g. your REAPER Scripts directory).
Step 2 — Load the script into REAPER
In REAPER, open Actions → Load ReaScript… and select JS_AmbiEncoder64_Motion_Map_GUI.lua. You only need to load the GUI script — it finds the writer automatically.
The writer script JS_Write_AmbiEncoder64_Spat_Motion_Automation.lua must be in the same folder as the GUI script. Do not separate the two files.
Step 3 — Assign the action (optional)
In the Actions window, find JS_AmbiEncoder64_Motion_Map_GUI and assign a keyboard shortcut or toolbar button for quick access.
For a more detailed walkthrough including Python OSC setup for macOS and Windows, see the Motion Map Setup guide.
3. First Launch
- In REAPER, select exactly one track that contains the ICST AmbiEncoder_64 FX.
- Set a time selection (loop range) in the REAPER timeline — this defines where automation will be written.
- Run the GUI script from the Actions menu (or your shortcut). The Motion Map window opens.
If you see “Bitte genau einen Track mit ICST AmbiEncoder_64 selektieren” (message appears in German), no AmbiEncoder track is selected. Select the correct track, then reopen the GUI.
If you see “Bitte zuerst eine Loop/Time Selection setzen” (message appears in German), set a loop range in the timeline before clicking Write.
4. The Interface at a Glance

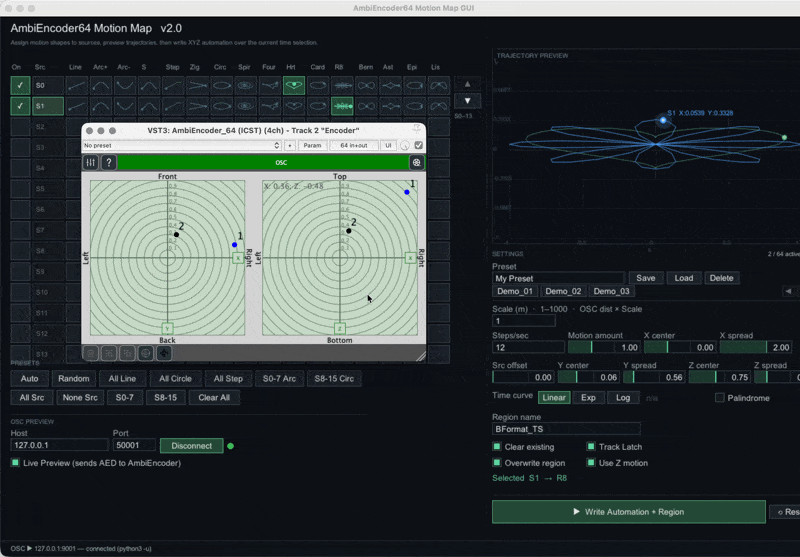
The window is divided into three areas:
Left — Source Grid: Rows for sources S0–S63. Each row has an enable toggle, a source label, and 17 motion-shape cells (Line through Lis, including Lat).
Right top — Trajectory Preview: Animated canvas showing the path each active source will travel. Axes are labelled X (left–right) and Y (up–down). The selected source shows a coordinate readout in the current scale unit (e.g. S0 X:-0.16 Y:-0.04).
Right bottom — Settings: Controls for scale, spatial parameters, timing, presets, and output options.
5. Enabling Sources
On first launch, all 64 sources are enabled and have shapes automatically assigned (Auto round-robin). There are three ways to toggle a source on or off:
- Click the ✓ checkbox in the “On” column — toggles that source on or off.
- Click the source label (e.g. S0, S1) — also toggles enable/disable with a larger click area.
- Shift+click a source label — enables all sources from the currently selected source down to the one you clicked (range enable).
The bottom bar shows Quick Selectors: All Src, None Src, S0-7, S8-15 for instant multi-source selection.
The counter in the top-right of the settings panel shows how many sources are currently active (e.g. 3 / 64 active).
6. Assigning Motion Shapes
Each row has 17 shape buttons. Click one to assign that movement pattern to a source. Assigning a shape also enables the source automatically.

| Label | Shape | Movement Character |
|---|---|---|
| Line | line | Linear sweep across the field |
| Arc+ | arc_up | Arc curving upward with smooth easing |
| Arc− | arc_down | Arc curving downward |
| S | s_curve | S-shaped sweep — sinusoidal Y motion |
| Step | step | Four discrete position steps |
| Zig | zigzag | Fast X/Y zigzag |
| Circ | circle | Full circle in the XY plane |
| Spir | spiral | Expanding spiral from center outward |
| Four | fourier_xyz | Complex 3-D path from summed harmonics |
| Lat | lattice | Repeated XYZ offset pattern with optional sliding and bounds |
| Hrt | heart_curve | Heart-shaped parametric curve |
| Card | cardioid | Cardioid — single-lobed teardrop curve |
| R8 | rose8 | Rose curve with 8 petals |
| Bern | bernoulli | Lemniscate of Bernoulli — figure-eight variant |
| Ast | astroid | Astroid — 4-cusped star curve |
| Epi | epicycloid | Epicycloid — complex looping orbit |
| Lis | lissajous | Lissajous figure — X and Y at different frequencies |
When multiple sources share the same shape, use the Src offset slider (see §7) to spread them across the trajectory — otherwise they all move together at the same position.
Lattice shape
Lat is a crystal-style repeated transform. Instead of tracing one continuous geometric curve, it starts at the current XYZ center point and keeps adding the XYZ spread vector over time.
- Starting point:
X center,Y center,Z center - Repeated offset:
X spread,Y spread,Z spread - Rate / T: how many lattice updates happen over one time selection
- Slide: smooths the transition between lattice points so the motion glides instead of snapping
- Bound X/Y/Z: optional wrap range around the center for each axis;
0disables bounding
This shape is useful for crystalline motion, staircase movement in depth, repeating spatial grids, and other structured offsets that keep propagating away from the origin.
Quick-assign buttons (PRESETS bar below the grid)
| Button | Effect |
|---|---|
| Auto | Assigns all 17 shapes in round-robin order across all 64 sources |
| Random | Assigns a random shape to every source |
| All Line | Sets all active sources to Line |
| All Circle | Sets all active sources to Circle |
| All Step | Sets all active sources to Step |
| S0-7 Arc | Assigns Arc+ to sources 0–7 |
| S8-15 Circ | Assigns Circle to sources 8–15 |
| Clear All | Removes all shape assignments and disables all sources |
7. Spatial Parameters
Coordinate system
The GUI works in Cartesian XYZ space (unit sphere −1..+1). The Scale value sets a display multiplier so you can think in metres instead of normalised units. REAPER automation is always written in the native unit sphere — Scale never changes what is recorded, only how values are displayed and how OSC distance is sent.
- X = left–right (−1 = left, 0 = center, +1 = right)
- Y = up–down (−1 = below, 0 = horizon, +1 = above)
- Z = distance (0 = near, 1 = far)
Controls
All sliders are draggable. Hold Shift while dragging for fine control. Click the value field on the right side of a slider to type an exact value.
| Parameter | Default | Description |
|---|---|---|
| Scale (m) | 1 | Room size in metres. Displayed coordinates are in Scale units (e.g. Scale 10 → range −10..+10 m). REAPER automation and OSC use values scaled back to the unit sphere. Type any value 1–1000. |
| Steps/sec | 12 | Automation point density per second. Higher = smoother but more envelope data. |
| Motion amount | 1.00 | Overall amplitude multiplier. 1.0 = full range; 0.5 = half; values above 1.0 extend beyond the defined spread and are clamped at the unit boundary. |
| X center | 0.00 | Left–right center of the movement field (−Scale..+Scale). |
| X spread | 2.00 | Total left–right range (0..2×Scale). 2.0 at Scale 1 = full −1..+1 sweep — the maximum range that can be written to REAPER. |
| Src offset | 0.00 | Temporal offset between sources along the trajectory. 0 = all sources at the same position; 1 = sources evenly distributed across the full path. Use this to separate sources that share the same motion shape. |
| Y center | 0.00 | Up–down center (−Scale = below, 0 = horizon, +Scale = above). |
| Y spread | 0.56 | Total vertical range. |
| Z center | 0.75 | Distance center (0 = near, Scale = far). |
| Z spread | 0.35 | Distance variation range. |
Lattice controls
These controls appear below the main spatial parameters and only affect sources using the Lat shape:
| Parameter | Default | Description |
|---|---|---|
| Rate / T | 8.0 | Number of lattice updates across one full time selection. 8 means the offset is added eight times over the selected duration. |
| Slide | 1.0 | Smoothing factor between lattice positions. 0 gives hard stepped jumps; 1 fully interpolates between steps; intermediate values blend the two. |
| Bound X / Y / Z | 0.00 | Optional per-axis wrap bounds around the center point. 0 disables bounding; positive values keep the repeated transform inside a finite range. |
Quantize controls
Quantization can be applied to any motion shape, not just Lattice. It turns continuous motion into stepped motion in time, space, or both.
| Parameter | Default | Description |
|---|---|---|
| Time / T | 0.0 | Number of time slices across one time selection. 0 disables time quantization. Example: 16 updates the curve at 16 evenly spaced moments. |
| Q X / Q Y / Q Z | 0.00 | Spatial rounding step per axis in normalised space. 0 disables rounding; 0.1 rounds that axis to the nearest 0.1. |
Use this when you want any shape to behave like a sequenced spatial grid: the trajectory is sampled in discrete time and/or rounded to discrete positions.
Reset button
Click ⟲ Reset (next to Write) to restore all spatial and timing parameters to their defaults while keeping shape assignments and presets unchanged.
Scale and OSC distance
When OSC Preview is active, the sent distance value equals the unit-sphere radius multiplied by Scale. At Scale 10, a source at the edge of the sphere sends a distance of ~10 m to the AmbiEncoder.
8. Time Curve — Shaping the Movement Rhythm
The Time Curve section controls how the animation progresses through time. Three modes:

| Mode | Behavior |
|---|---|
| Linear | Constant speed — the shape unfolds at even pace (default). |
| Exp | Slow start, fast finish — motion accelerates toward the end. |
| Log | Fast start, slow finish — motion decelerates toward the end. |
The n slider (exponent) sets how strong the curve is. At n = 1 all three modes produce identical results. A typical value is 2.0–3.0.
When to use it: Exp is useful for sources that should “arrive” abruptly; Log gives a sweeping entry that settles. Combine with Palindrome for symmetric acceleration.
9. Palindrome Mode
When Palindrome is enabled, the motion plays forward and then backward within the same time selection: the shape travels 0 → 1 → 0 instead of 0 → 1.
This means:
- The source returns to its start position at the end.
- Useful for oscillating movements without a hard jump cut.
- Works with all motion shapes.
- Combine with Exp or Log time curve for asymmetric forward/backward speeds.
10. Output Options
| Option | Description |
|---|---|
| Clear existing | Deletes existing envelope points in the time selection before writing. Turn off to layer movement on top of existing automation. |
| Track Latch | Sets the track to Latch automation mode after writing, so live parameter movements record on the next playback pass. |
| Overwrite region | If a region with the same name already exists, it is repositioned to match the current time selection instead of creating a duplicate. |
| Use Z motion | Includes distance (Z) variation. Disable to keep sources at a fixed distance while X and Y still move. |
Region name
Sets the name of the REAPER render region created at the time selection. Default: BFormat_TS. Name regions to match your scene structure — they appear in the REAPER project and in render exports.
11. Preset System
The Preset bar at the top of the Settings panel lets you save, load, and delete complete parameter snapshots.
A preset stores: all motion shape assignments, which sources are enabled, Scale, all XYZ spatial parameters (center and spread for X, Y, Z), Src offset, Steps/sec, Motion amount, all Lattice settings, all Quantize settings, Time Curve mode and exponent, Palindrome, Use Z motion, and all output options.
Saving a preset
- Type a name in the Preset text field (e.g.
Circle_Wide). - Click Save.
Loading a preset
- Click a preset chip (the buttons below the text field) to load it instantly.
- Or type the name and click Load.
Deleting a preset
Type the name (or click the chip to fill it in) and click Delete.
Navigating many presets
Use the ◄ ► arrows to scroll through more than 6 saved presets. Presets persist across REAPER sessions (stored via REAPER ExtState).
12. Live OSC Preview
The OSC Preview section sends live position data to the AmbiEncoder while the animation plays in the GUI — so you can hear the movement before committing it to automation.
Step-by-step setup
- In REAPER Preferences → Control/OSC/web, enable “Allow binding of REAPER action and FX parameters to OSC” and note or set the port (default
9001). - In the GUI, set Host to
127.0.0.1(or the IP of your REAPER machine) and Port to match. - Click Connect. The status dot turns green when the Python helper is running.
- Enable Live Preview (sends AED to AmbiEncoder).
The GUI now sends converted OSC position messages at ~30 Hz for every enabled source using the address:
/icst/ambi/sourceindex/aed <int index> <float azimuth> <float elevation> <float distance>
Example — source 3 at 45° azimuth, −15° elevation, 2.5 m distance:
/icst/ambi/sourceindex/aed 3 45.0 -15.0 2.5
OSC distance is sent in physical metres (unit radius × Scale).
Click Disconnect to stop sending OSC.
Live Preview requires Python 3 to be installed and accessible as python3 in your system PATH. If the status dot stays red, open a terminal and run python3 --version to verify.
13. Writing Automation
Once sources are set up and parameters look right in the preview:
- Make sure the correct REAPER track is selected.
- Confirm the time selection covers the region you want to fill.
- Click ▶ Write Automation + Region.
The script will:
- Delete existing envelope points in the time selection (if Clear existing is on).
- Write XYZ automation for every enabled source directly in the unit sphere (−1..+1), independent of the Scale display setting.
- Set the track to Latch mode (if Track Latch is on).
- Create or update a named render region.
A status message at the bottom of the GUI confirms completion.
14. Trajectory Preview
The preview canvas shows all active sources simultaneously. The horizontal axis is X (left–right) and the vertical axis is Y (up–down), both labelled in the current Scale unit.
- Each source gets its own color. The selected source has a pulsing halo and a coordinate readout (e.g.
S0 X:-0.16 Y:-0.04at Scale 1, orS0 X:-1.6 Y:-0.4at Scale 10). - Non-selected sources show smaller dots at 80% opacity.
- All dots animate at the same speed — you see the full spatial scene in real time.
- Trails show the full path each source will travel.
Click a source label in the grid to select it and see its coordinates in the preview.
15. Good Practices
- Full left–right sweep: set X center = 0, X spread = 2×Scale (e.g.
2.00at Scale 1,20.00at Scale 10). This writes the full −1..+1 range to REAPER automation. - Separate overlapping sources: if two sources have the same shape and their trails overlap, increase Src offset to 0.3–0.5 to spread them along the trajectory.
- Scale as room size: set Scale to your actual room radius (e.g. 8 for an 8 m radius space). The OSC preview then sends distances in metres. REAPER automation is unaffected.
- Start with Auto + 3–4 sources enabled to explore the default shape spread.
- Use Steps/sec 6–8 for broad, slow sweeps; 20–30 for detailed, dense movement.
- Keep Motion amount at 1.0 initially — values above 1.0 can clip at the unit sphere boundary.
- Use Clear existing off to layer a Circle on top of an existing Line automation.
- Palindrome + Log creates a movement that sweeps quickly outward and gently returns — good for reverb-like spatial tails.
- Save a preset before experimenting so you can always return to a known state.
- Name render regions to match scenes:
Intro_BFormat,Verse_BFormat,Outro_BFormat. - Lattice as a spatial arpeggio: set Rate/T = 8–16 and Slide = 0 for hard stepped jumps between positions — like a spatial sequencer firing at each step.
- Lattice with Bounds: keep Bound X = 1.0 and Bound Y = 0.5 to contain sources within the front hemisphere while still propagating.
- Quantize for rhythmic motion: set Time/T = 16 on a Circle shape to turn a smooth orbit into 16 discrete positions — snaps to the beat if Steps/sec matches your tempo.
- Combine Lat + Quantize: Lattice defines where sources jump; Quantize defines when — together they create structured, grid-based spatial sequences.
16. Troubleshooting
No sources move after writing
Check that at least one source has a ✓ in the “On” column and an assigned shape (highlighted cell). The status bar at the bottom reports what was written.
Sources all move to the same position
Increase Src offset above 0 so that sources with the same shape are temporally distributed along the path.
The automation doesn’t match the preview
Make sure Motion amount, X/Y/Z spread, and Time Curve settings are the same as when you previewed. If you changed parameters after previewing but before writing, the written automation reflects the state at write time.
OSC Preview — dot stays red
- Verify Python 3 is installed: open a terminal and run
python3 --version. - Check that the Port matches your REAPER OSC settings.
- Click Disconnect, then Connect again to restart the helper.
Writer script not found
Both Lua files must be in the same directory. If you moved the GUI script after loading it into REAPER, reload it from the new location via Actions → Load ReaScript.
Steps/sec too low for short regions
A 0.1-second time selection at 12 Steps/sec produces only 1 automation point. Increase Steps/sec or lengthen the time selection.
Lattice sources glide instead of stepping
Set Slide to 0. At Slide = 1 the motion interpolates smoothly between lattice steps; at Slide = 0 it snaps instantly.
Lattice sources drift out of the speaker array
Enable Bound X / Y / Z. Set each bound to the normalised radius you want to stay within (e.g. 0.8 keeps sources within 80 % of the sphere). With bounds at 0 the lattice offset accumulates indefinitely.
Quantize has no visible effect
Time/T must be greater than 0 to activate time quantization. A value of 0 (the default) disables it. Set Time/T to the number of steps you want (e.g. 16) and make sure Steps/sec is high enough that each time slice contains at least one automation point.
See also
- ICST Ambi Motion Markers — for musically timed, cue-based movement between defined positions
- ICST Encoders — the encoder plugin this script targets
- Installation — plugin setup
- Motion Map Setup — Python OSC setup for macOS and Windows