ICST Kristall Motion Map — User Guide
Level: Intermediate | Audience: Composer, sound designer, spatial-audio technician. | Version: 2.4.0
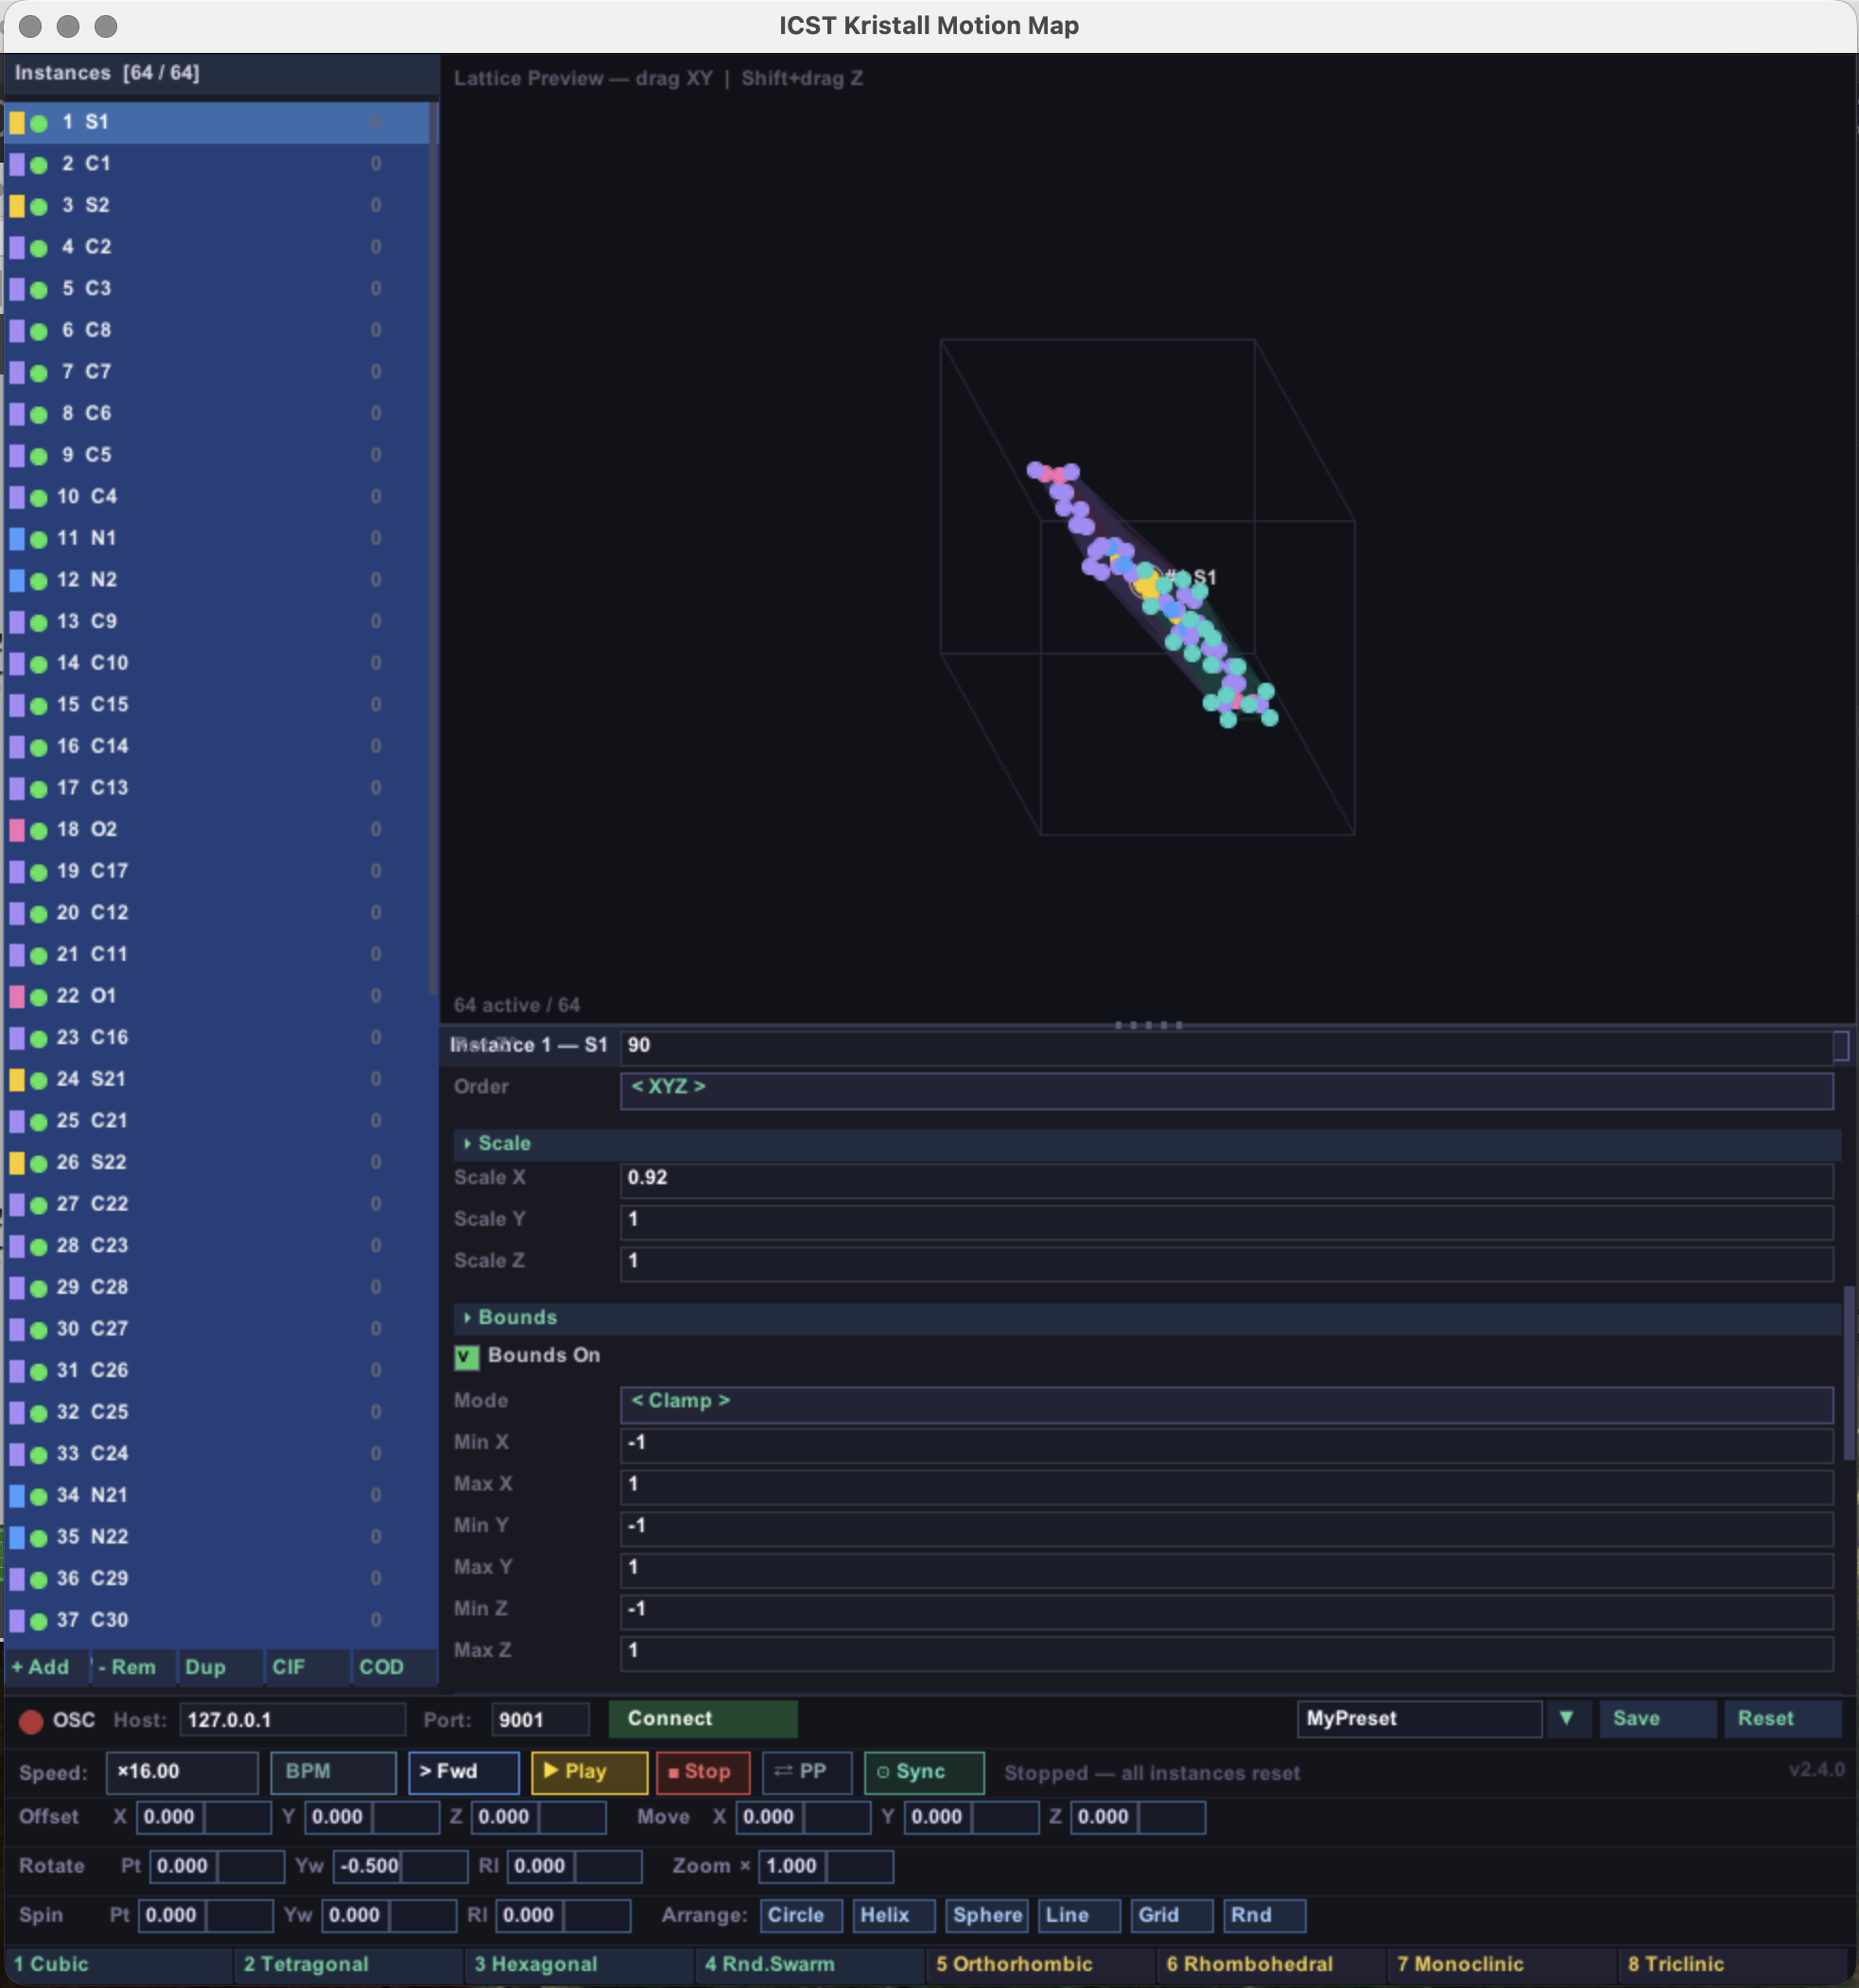
ICST Kristall Motion Map is a standalone REAPER Lua script with a real-time graphical interface. It arranges up to 64 AmbiEncoder sources as points within a 3D crystal lattice and moves them through space using a step sequencer. The movement can be tracked live in the isometric preview, sent via OSC to an ICST AmbiEncoder_64, and shaped using instance-specific transformations, quantisation, smoothing and interaction. This instrument was created in collaboration with and inspired by Eli Stine, a guest at the ICST Studio Residency 2026.
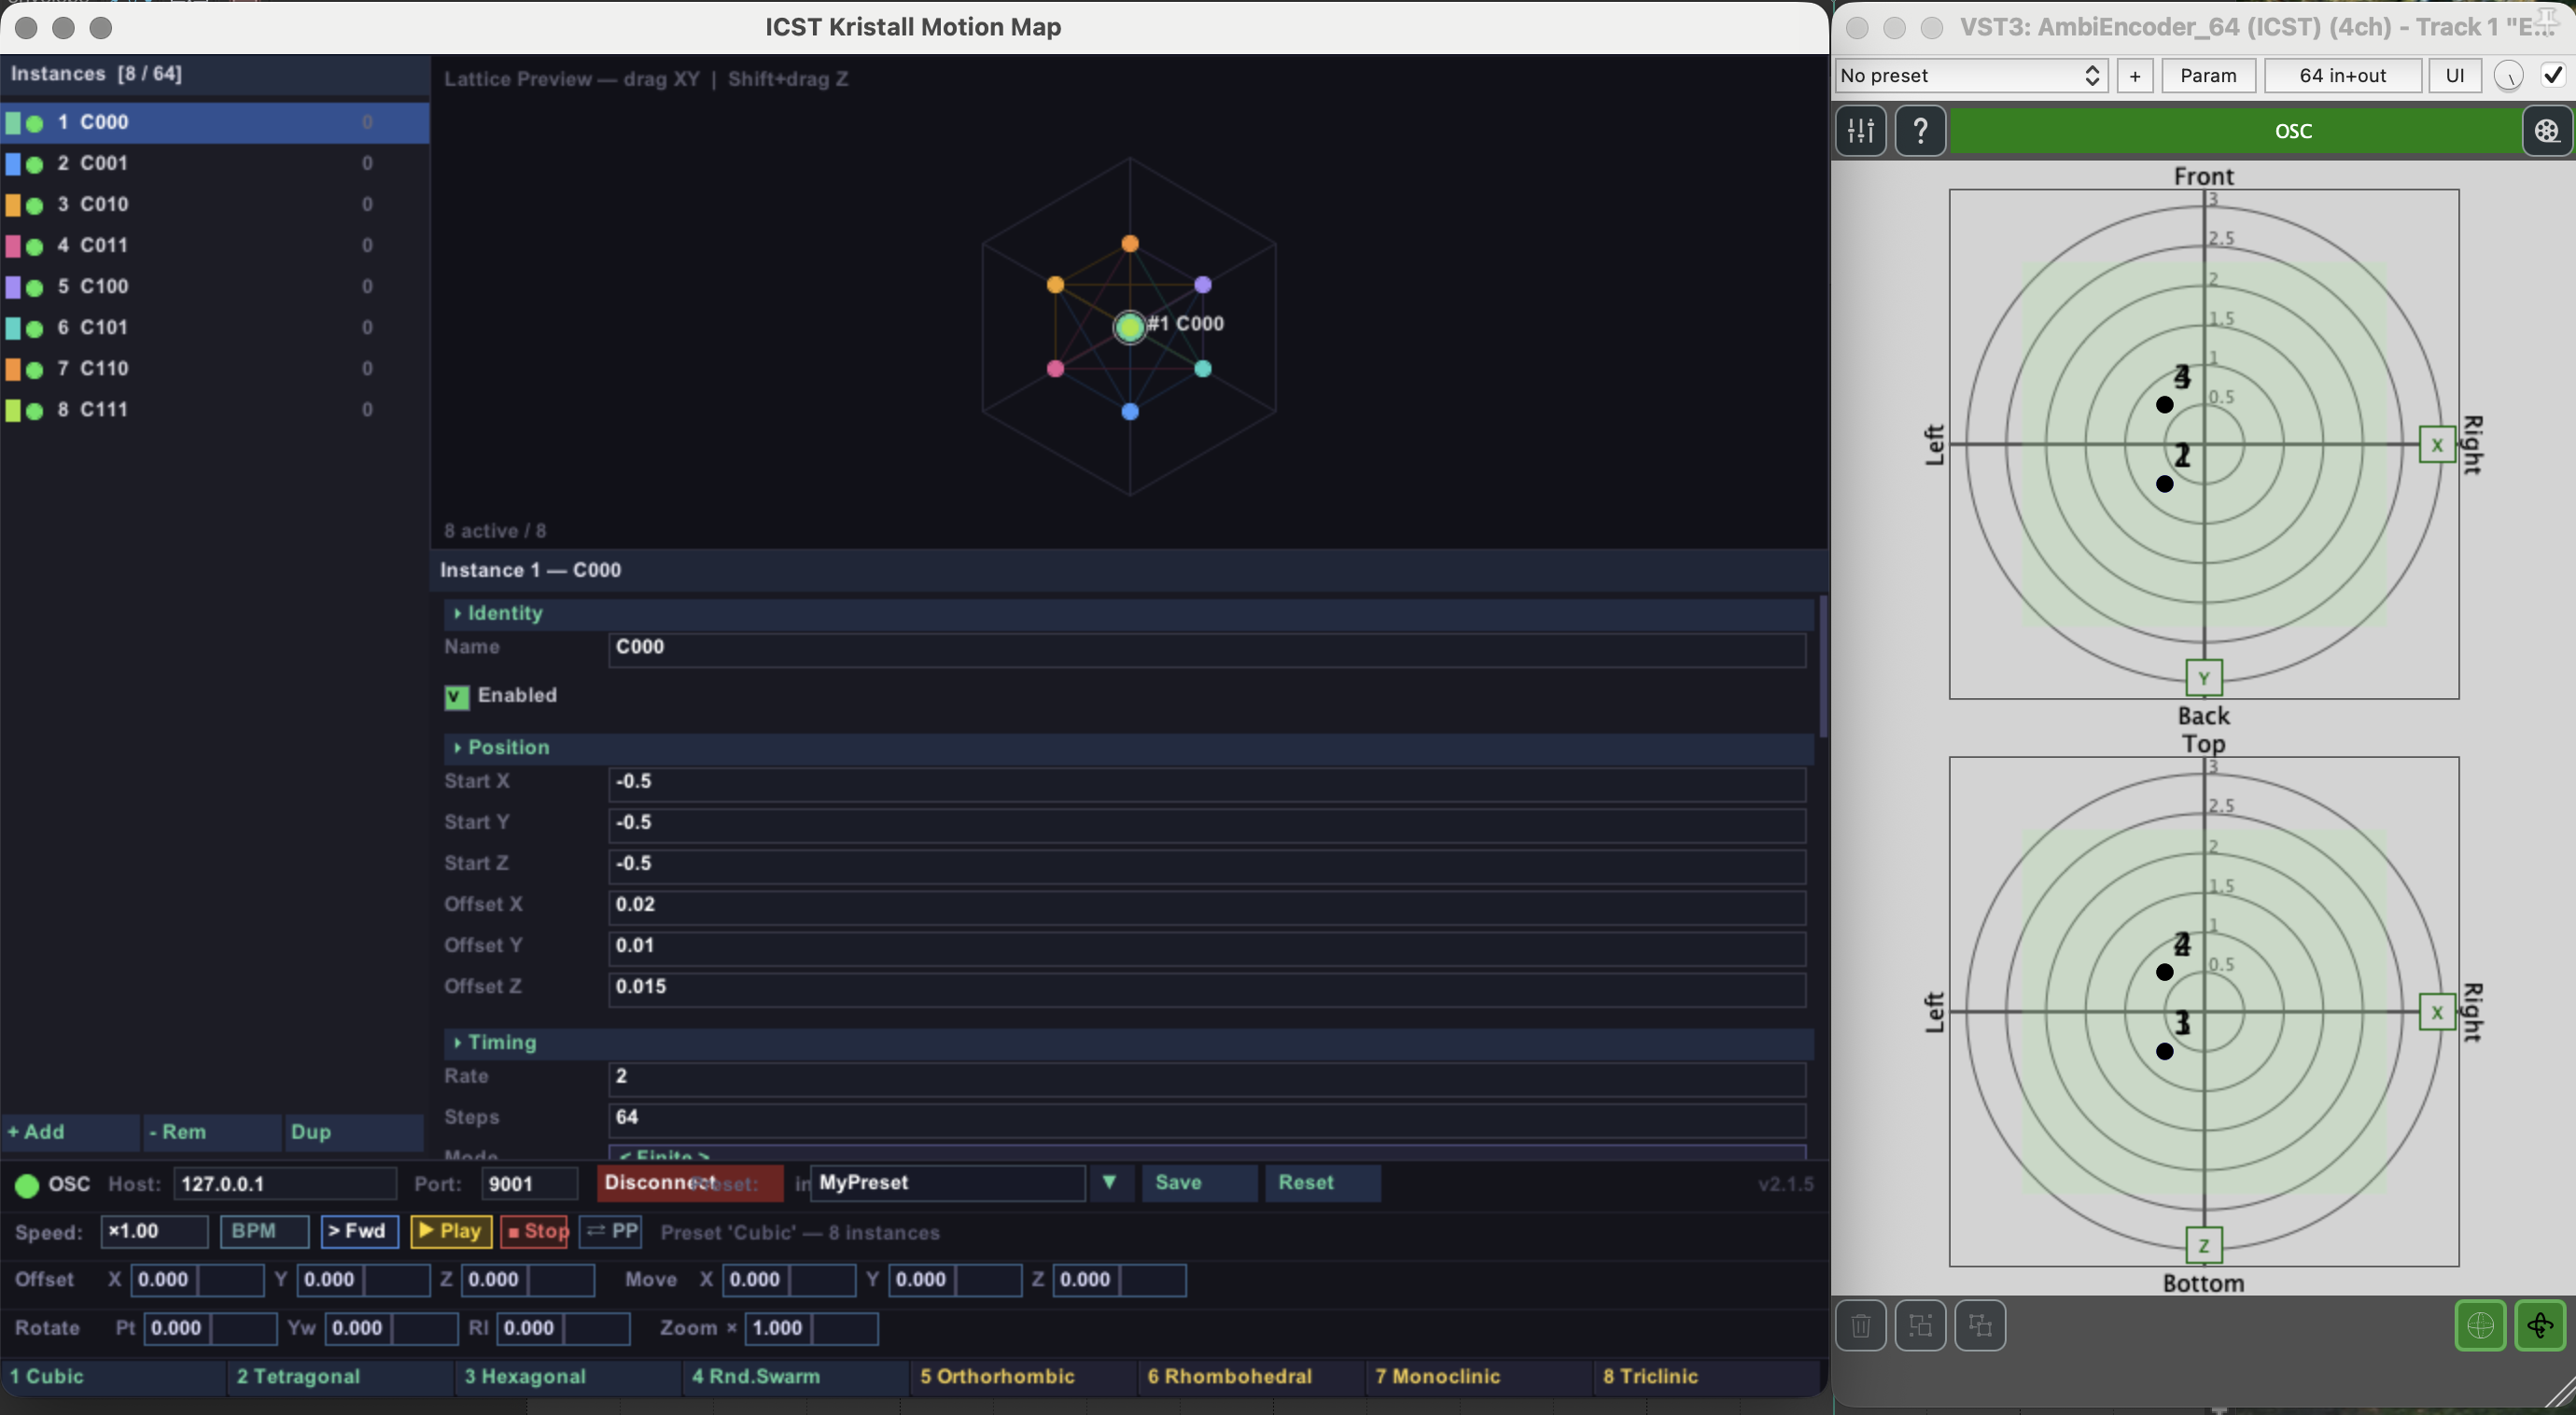
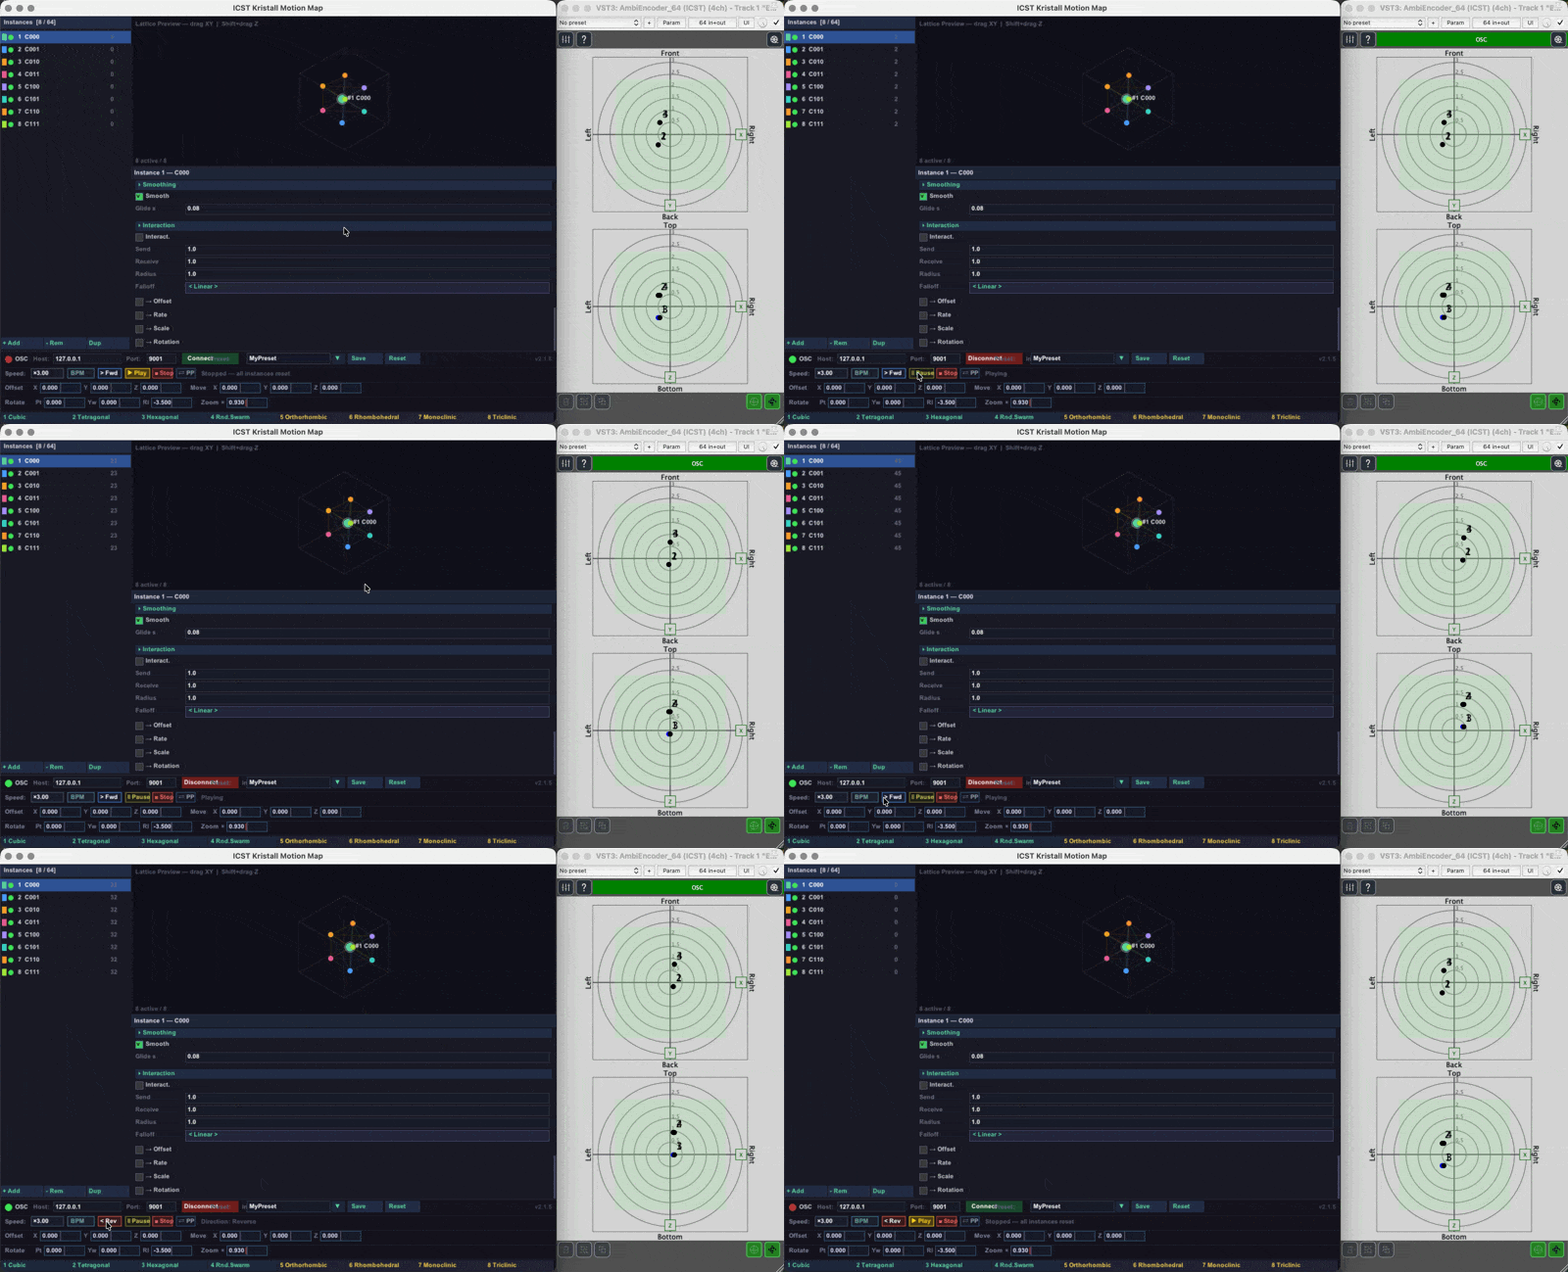
This is a short demo of a random Kristall by Eli Stine — rendered in binaural.
Chapters
- 00:00 Introduction
- 02:41 Installation
- 11:24 Plug-in Parameters
- 24:57 Importing Crystalline Structures
- 27:37 Writing Automation to REAPER Session
🎧 Listen with headphones. This recording is binaural — the spatial effect is lost on speakers.
More binaural examples — headphones recommended, each normalised to -23 LUFS.
Ex. 1
Ex. 2
Ex. 3
Ex. 4
Ex. 5
These Kristall Motion Map examples are by Eli Stine, created during his ICST Studio Residency 2026.
New to Kristall? Skip to §13 First session walkthrough and get your first preset running in under five minutes — then come back here for detailed reference.
New in v2.4.0: load real crystal structures — the new COD and CIF buttons import atoms from the Crystallography Open Database. Also new: a resizable lattice preview, preview axes aligned with the encoder (+X right, +Y front, +Z up), DAW transport following in BPM mode (Play/Stop drives Kristall), and click-to-select / right-click-to-reset value fields.
1. Requirements
- REAPER v6 or later (v7 recommended)
- ICST AmbiEncoder_64 on the target track — see Installation
- Python 3 with
python-osc— required only for the live OSC preview bridge- macOS / Linux:
pip3 install python-osc - Windows: see Python on Windows below
- macOS / Linux:
2. Installation
Step 1 — Download the bundle
Download ICST_Kristall_Motion_Map_Bundle.zip (also available on the Downloads page). Unzip it anywhere on your computer — for example ~/REAPER/Scripts/ICST_Kristall_Motion_Map_Bundle/.
The bundle contains:
scripts/JS_ICST_Kristall_Motion_Map.lua— the main scriptjsfx/JS_ICST_Kristall_Controller.jsfx— optional MIDI/JSFX control surfaceREADME.md— quick-start instructions
Step 2 — Load as a ReaScript
- In REAPER, go to Actions → Load ReaScript…
- Navigate to
JS_ICST_Kristall_Motion_Map.luaand click Open. - REAPER adds the script to the Actions list. Run it once — the Kristall Motion Map window opens.
Python on Windows
Windows users: REAPER often cannot find Python automatically. Follow these three steps after installing Python from python.org/downloads.
Step 1 — Find your Python path. Open a Command Prompt and run:
python -c "import os, sys; print(os.path.dirname(sys.executable))"
Example output: C:\Users\stine\AppData\Local\Python\pythoncore-3.14-64
Step 2 — Point REAPER to Python. Go to Preferences → Plug-ins → ReaScript, enable “Force ReaScript to use specific Python .dll…”, and point it to the python3xx.dll inside that folder (e.g. python314.dll).
Step 3 — Install python-osc using the same Python:
python -m pip install python-osc
Step 3 — Optional: launcher file
If you prefer to keep the script in a version-controlled folder, create a one-line launcher anywhere in your REAPER Scripts directory:
-- JS_ICST_Kristall_Motion_Map_Launcher.lua
dofile('/path/to/JS_ICST_Kristall_Motion_Map.lua')
Load this launcher as the ReaScript instead. To reload after editing the main script, close the Kristall window, then re-run the launcher action.
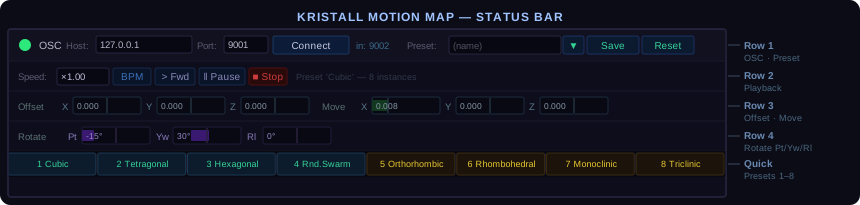
3. The interface at a glance
The window is divided into four areas:
┌─────────────────┬──────────────────────────────────────┐
│  Instance list  │       Lattice preview (3D iso)        │
│                 ├──────────────────────────────────────┤
│  [+Add] [-Rem]  │    Parameter panel  [↺ Def]           │
│  [Dup]          │    (scrollable, per-instance)         │
├─────────────────┴──────────────────────────────────────┤
│  Row 1: OSC · Preset name · Save · Reset               │
│  Row 2: Speed · BPM · Fwd/Rev · Pause · Stop · PP · Sync │
│  Row 3: Offset X Y Z · Move X Y Z                     │
│  Row 4: Rotate Pt · Yw · Rl · Zoom                    │
│  Row 5: Spin Pt · Yw · Rl · Arrange buttons           │
│  Preset bar: Cubic · Tetragonal · … · Triclinic        │
└────────────────────────────────────────────────────────┘
4. Instance list
The left panel lists all active instances. Each row shows the instance number, color dot, name, and current step count.
| Control | Action |
|---|---|
| Click a row | Select that instance; parameter panel updates |
| Shift + click | Add to selection (multi-select); all selected instances share parameter edits |
| + Add | Create a new instance with default settings |
| − Rem | Delete the selected instance |
| Dup | Duplicate the selected instance |
| Keyboard A | Add instance |
| Keyboard D | Duplicate selected |
| Keyboard R | Reset selected instance to step 0 |
| Keyboard Cmd+A | Select all instances at once |
The maximum is 64 instances. Adding beyond this limit has no effect.
5. Lattice preview
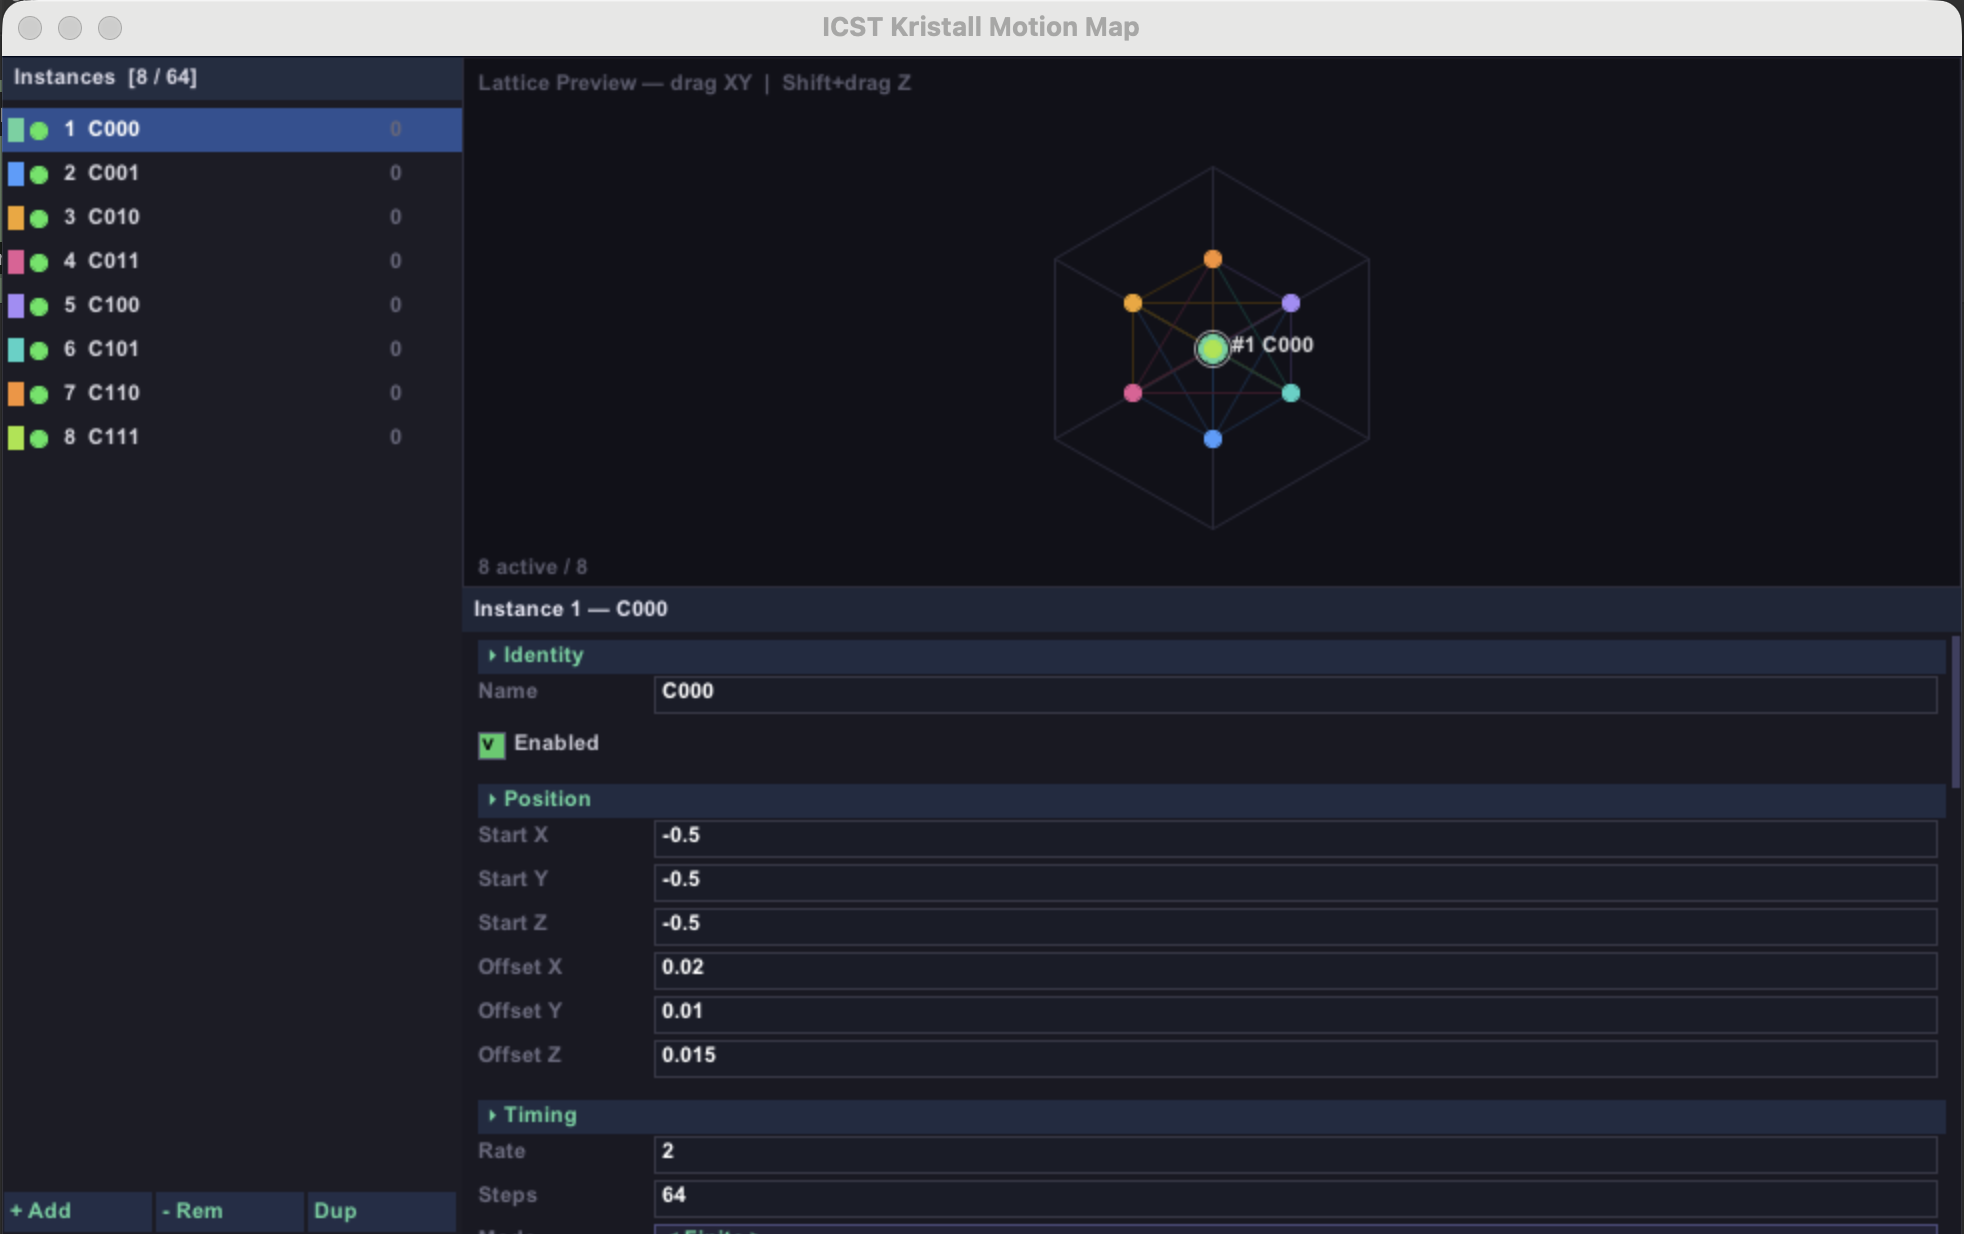
The top-right panel shows all enabled instances as colored dots in an isometric 3D projection. A unit-cube guide is drawn in the background.
| Interaction | Effect |
|---|---|
| Drag a dot | Move the instance in the XY plane (updates Start X and Start Y) |
| Shift + drag | Move the instance along the Z axis (updates Start Z) |
| Shift + click a dot | Add that instance to the multi-select set |
| Hover | Shows instance name and a highlight ring |
Edges are drawn between any two instances within EDGE_DIST world units — this gives a quick visual of the lattice topology.
6. Parameter panel
The right column below the preview shows all parameters for the selected instance. Use the mouse wheel to scroll.
The panel header shows the instance number and name. A small ↺ Def button in the top-right corner of the header resets all parameters of the selected instance(s) to factory defaults (position, offsets, rate, step count, mode, rotation, scale, bounds, smoothing). The instance name and colour are preserved. If multiple instances are selected, all are reset at once.
Editing values
Every numeric field supports three ways to change its value without typing:
| Method | How | Note |
|---|---|---|
| Scroll wheel | Click the field to focus it, then scroll up/down | Each key type has an appropriate step size (see table below). Hold Shift for a ×10 coarser step. |
| Cmd + drag | Hold Cmd, click the field, then drag the mouse up (increase) or down (decrease) | Hold Shift additionally for a ×0.1 finer step. Changes propagate to all selected instances as a relative delta. |
| Direct edit | Click the field, type a value, press Enter | Press Esc to cancel. |
Scroll step sizes per field type:
| Field | Step |
|---|---|
| Step Count | 1 (integer only) |
| Rotation fields | 1.0° |
| Offset fields | 0.005 |
| Rate | 0.05 |
| Start position | 0.01 |
| Smoothing / Glide | 0.01 |
Basic parameters — everything you need for a first session:
Identity
| Parameter | Description |
|---|---|
| Name | Label shown in the instance list |
| Enabled | If unchecked, the instance is frozen and excluded from OSC output |
Position
| Parameter | Description |
|---|---|
| Start X / Y / Z | World-space origin of this instance (drag in preview to set visually) |
| Offset X / Y / Z | Step vector — how far the source moves per step along each axis |
Each step, the raw position is computed as:
position = Start + currentStep × Offset
Timing
| Parameter | Description |
|---|---|
| Rate | Steps per second (BPM OFF) or steps per beat (BPM ON) |
| Steps | Total step count; determines turn-around point for Finite and Pingpong |
| Mode | Infinite — steps forever; Finite — stops at last step; Pingpong — bounces |
Motion transforms — shape the path after the basic linear motion is computed:
Rotation
Rotation pivots around the Start position using an Euler rotation matrix. Angles are in degrees.
| Parameter | Description |
|---|---|
| Rot X / Y / Z | Euler angles in degrees |
| Order | Application order: XYZ, XZY, YXZ, YZX, ZXY, ZYX |
Scale
Scales the offset vector relative to the Start position.
| Parameter | Description |
|---|---|
| Scale X / Y / Z | Per-axis stretch factor |
Bounds
Constrains the position to a box after rotation and scale.
| Parameter | Description |
|---|---|
| Bounds On | Enable bounds processing |
| Mode | None, Clamp (stop at edge), Wrap (teleport to opposite side), Mirror (reflect) |
| Min / Max X / Y / Z | Bounding box corners |
Quantize
| Parameter | Description |
|---|---|
| Space Q. | Snap final position to a grid before smoothing |
| Time Q. | Snap step advances to beat subdivisions |
| Grid X / Y / Z | Grid cell size per axis (Space Q.) |
Smoothing
An exponential-decay lerp between the stepped target position and the output:
alpha      = 1 − exp(−dt / glideTime)
currentPos = currentPos + alpha × (targetPos − currentPos)
| Parameter | Description |
|---|---|
| Smoothing | Enable/disable the filter |
| Glide Time | Time constant in seconds — 0.08 s is snappy, 0.5 s is slow |
Advanced — instances influencing each other (optional for basic use):
Interaction

Instances can influence each other’s speed and direction based on proximity.
| Parameter | Description |
|---|---|
| Interaction | Enable for this instance |
| Send Amount | How strongly this instance influences others |
| Receive Amount | How strongly this instance accepts incoming influence |
| Radius | Sphere of influence in world units |
| Falloff Mode | Linear / Inverse Square / Gaussian |
| Affect Offset | Incoming influence modifies the step direction |
| Affect Rate | Incoming influence modifies the step rate |
7. Status bar — Row 1: OSC and Presets

OSC
| Control | Description |
|---|---|
| Colored dot | Green = connected, red = disconnected |
| Host field | IP address of the OSC target (default 127.0.0.1) |
| Port field | UDP port of the OSC target (default 9001) |
| Connect / Disconnect | Open or close the OSC bridge |
| in: PORT | Shown when connected — the UDP port on which the Kristall listens for incoming OSC messages (always output port + 1, e.g., 9002 when the output port is 9001) |
Click any field to edit, then press Enter to confirm.
Presets
| Control | Description |
|---|---|
| Name field | Type a preset name |
| ▼ | Open the saved-preset dropdown |
| Save | Save all current instances under the preset name |
| Reset | Clear all instances and revert to the default Cubic preset |
Presets are stored in REAPER’s ExtState (project-independent, persistent across sessions).
8. Status bar — Row 2: Playback controls
| Control | Description |
|---|---|
| Speed ×N.NN | Global rate multiplier — scales all instance rates uniformly. Click to type a value, Enter to confirm. |
| BPM | Toggle BPM sync. Off = steps/second (absolute). On = steps/beat (follows REAPER tempo). |
| > Fwd / < Rev | Global direction. Fwd = all instances step forward. Rev = all instances step in reverse. |
| ‖ Pause | Freeze all motion at the current step. Click again to resume. |
| ■ Stop | Reset all instances to step 0 and pause immediately (motion does not resume automatically). Click ‖ Pause or restart to continue. |
| ⇄ PP | Toggle global Pingpong mode — all instances bounce instead of repeating forward. |
| ⊙ Sync | Reset the phase accumulator and step counter of all selected instances to 0, snapping them back in sync without affecting instances that are not selected. |
BPM mode in detail
When BPM is OFF: Rate = 2 means the instance advances 2 steps every second, regardless of tempo.
When BPM is ON: Rate = 1 means 1 step per quarter note. At 120 BPM this is 2 steps/sec; at 60 BPM it is 1 step/sec. An instance with 64 steps and Rate 1 completes one cycle every 64 quarter notes (16 bars in 4/4).
9. Status bar — Row 3: Global offset and movement
Row 3 contains six scrubber sliders, all with range −2.0 to +2.0.
Offset X / Y / Z — Global translation
Shifts all instance positions uniformly after all per-instance transforms. Use this to place the entire crystal anywhere in the Ambisonics space without touching individual Start positions.
Example: Offset X = 0.5 moves all sources 0.5 units to the right.
Move X / Y / Z — Global movement direction
Adds a per-step offset to all instances on top of their own Offset X/Y/Z. Use this to make the entire crystal drift through space in a chosen direction.
Example: Move X = 0.01 adds 0.01 units per step along X to every instance — the whole crystal drifts rightward. Combine Move X = 0.007 and Move Y = 0.007 for a diagonal drift.
Offset and Move are not saved in presets — they are session-level controls intended for real-time performance.
10. Status bar — Row 4: Global rotation and zoom
Row 4 contains three rotation scrubbers and a Zoom scrubber, all applied after per-instance transforms and the global Offset.
Rotation (Pt / Yw / Rl)
Rotates the entire crystal around the world origin. Angles in degrees, range −180 to +180.
| Slider | Axis | Effect |
|---|---|---|
| Pt (Pitch) | X | Tilts the crystal forward / backward |
| Yw (Yaw) | Y | Spins the crystal left / right |
| Rl (Roll) | Z | Rolls the crystal clockwise / counter-clockwise |
Zoom (×)
Scales the entire crystal figure uniformly around the origin — after rotation, before translation. Range 0.0–2.0, neutral at 1.0.
| Value | Effect |
|---|---|
| 0.0 | All sources collapse to the origin |
| 1.0 | No change (neutral) |
| 2.0 | Figure double size |
Zoom is applied to the lattice preview and the live OSC output in real time. Drag the × scrubber or click it to type an exact value.
Drag any slider horizontally or click it to type a value, then press Enter to confirm.
Rotation and Zoom act on the final effective position of every instance. The lattice preview updates in real time even while playback is paused.
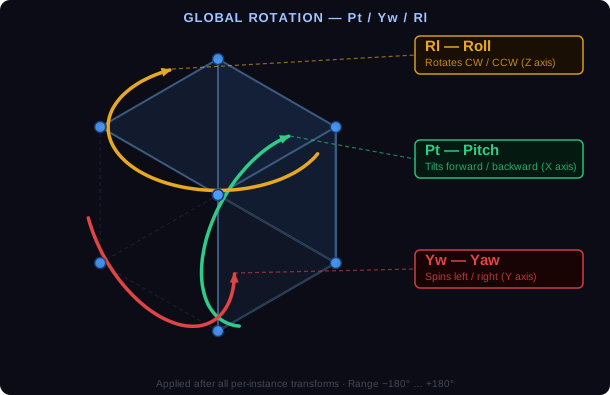
Rotation can also be controlled externally — see §11 External control.
11. External control — OSC input and MIDI
OSC input
When the OSC bridge is connected (Connect clicked, status dot green), the Kristall simultaneously listens for incoming OSC messages on output port + 1 (e.g., port 9002 when the output port is 9001). The receive port is shown as in: PORT next to the Connect button.
Send any of these messages from TouchOSC, Max/MSP, OSSIA, SuperCollider, or any OSC-capable tool:
| OSC address | Arguments | Effect |
|---|---|---|
/kristall/pitch | <float degrees> | Set global Pitch (−180…+180) |
/kristall/yaw | <float degrees> | Set global Yaw (−180…+180) |
/kristall/roll | <float degrees> | Set global Roll (−180…+180) |
/kristall/rotate | <float pitch> <float yaw> <float roll> | Set all three at once |
The values are applied immediately and override the on-screen sliders. Clipping to −180…+180 is applied automatically.
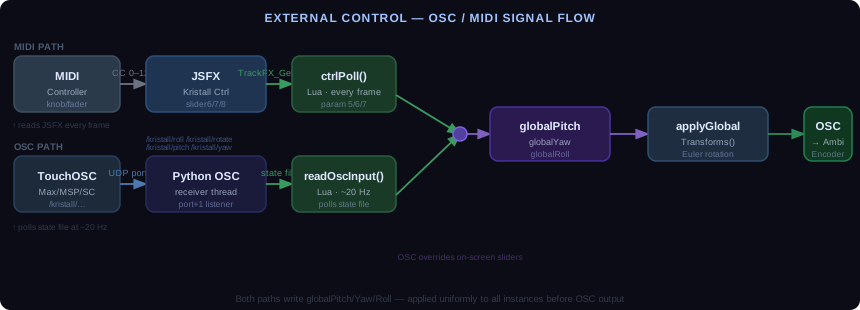
Example — rotate the crystal with TouchOSC:
- Connect in the Kristall GUI (output port
9001, target127.0.0.1). - In TouchOSC, set the OSC target to
127.0.0.1:9002. - Assign a fader to
/kristall/yaw, range −180 to +180. - Moving the fader spins the crystal in real time.
MIDI via JSFX controller bridge
If a Kristall Controller JSFX is present on any track, the Kristall script reads its parameters automatically:
| JSFX slider | Parameter index | Range | Effect |
|---|---|---|---|
| slider6 | 5 | −180…+180° | Global Pitch |
| slider7 | 6 | −180…+180° | Global Yaw |
| slider8 | 7 | −180…+180° | Global Roll |
| slider9 | 8 | −2…+2 | Offset X |
| slider10 | 9 | −2…+2 | Offset Y |
| slider11 | 10 | −2…+2 | Offset Z |
| slider12 | 11 | −2…+2 | Move X |
| slider13 | 12 | −2…+2 | Move Y |
| slider14 | 13 | −2…+2 | Move Z |
| slider15 | 14 | 0…2 | Zoom × |
Map MIDI CCs to sliders 6–8 for rotation control. For automation envelopes on Offset, Move, and Zoom (sliders 9–15): right-click the JSFX in the FX chain → Param → enable the envelope for the desired slider, then draw it in the REAPER envelope lane. The sliders are read every frame as long as the JSFX is present on any track.
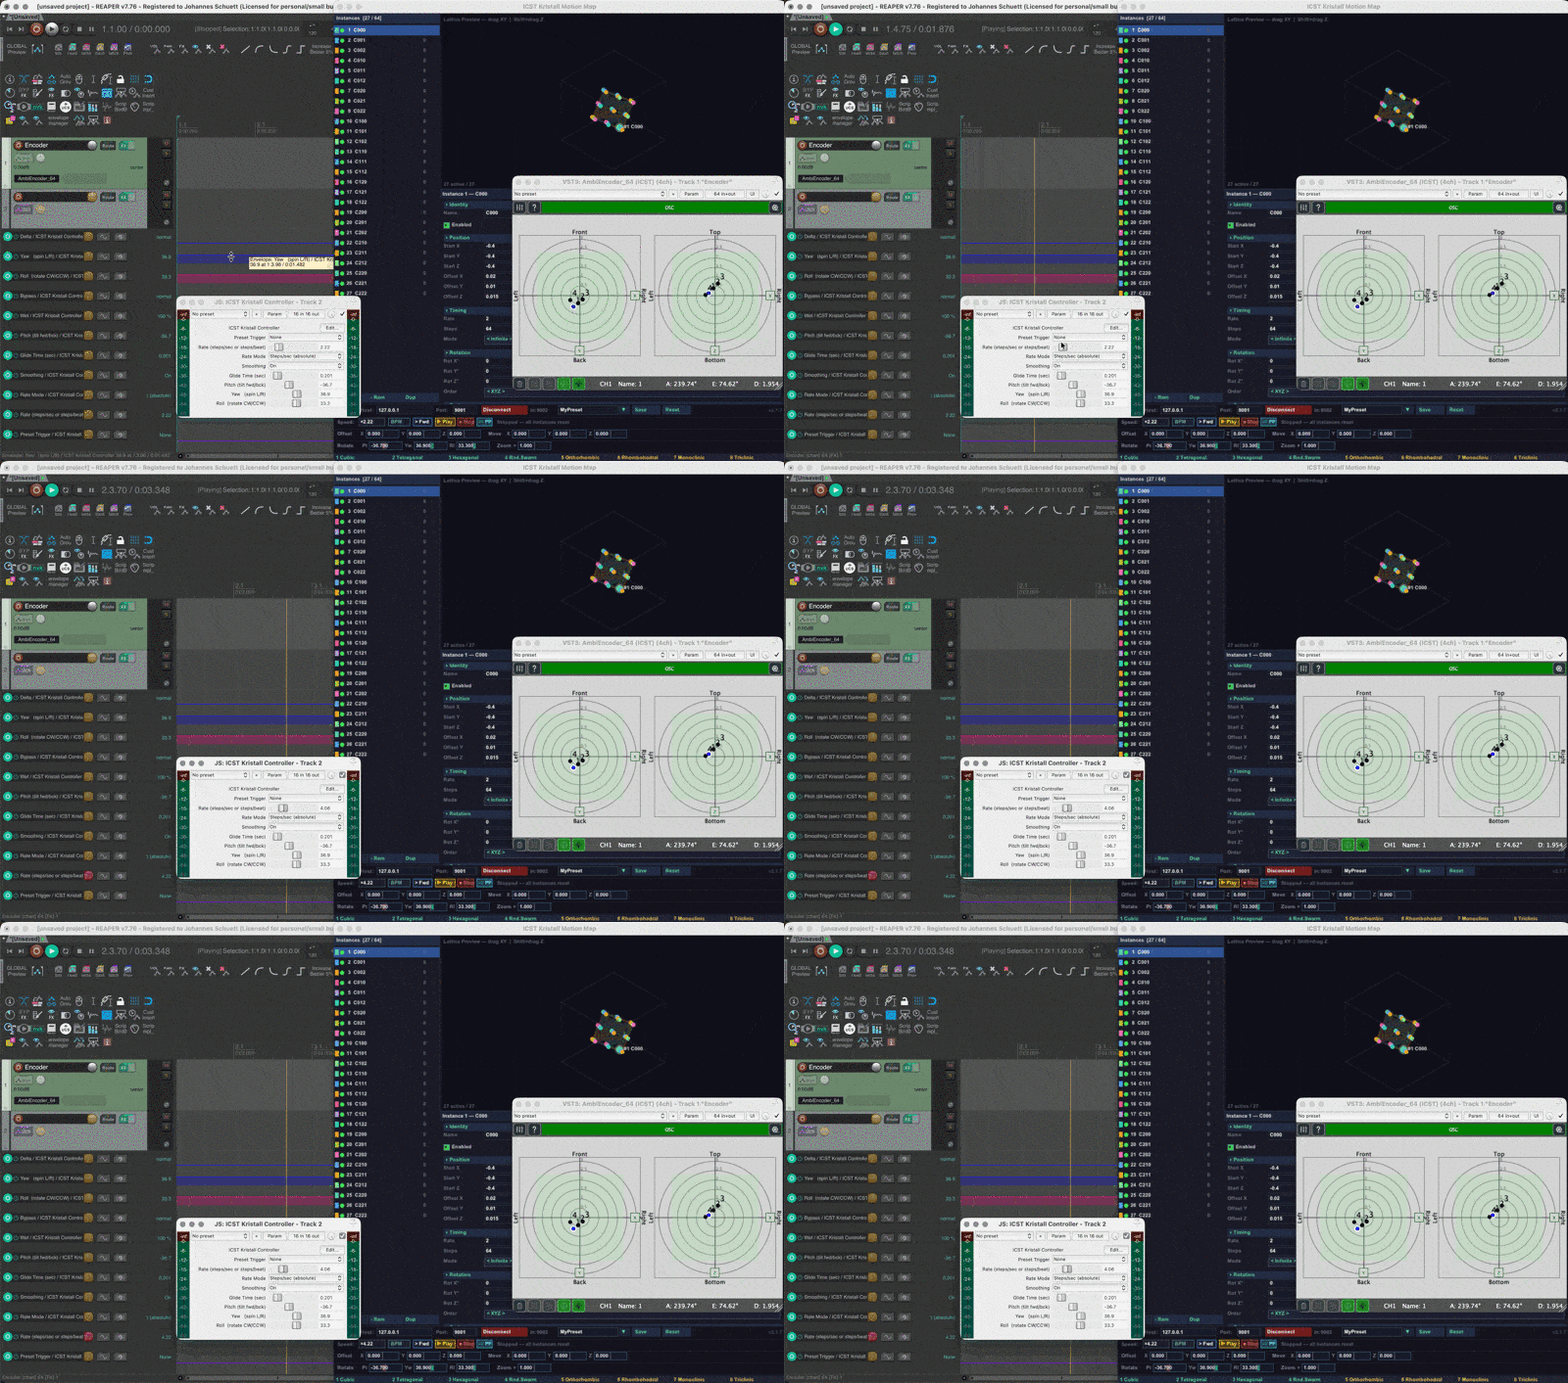
JSFX Pitch/Yaw/Roll take effect only when at least one of the three is non-zero. If all three are 0 (or the JSFX does not expose these sliders), the on-screen sliders retain their values.
12. Built-in presets (quick-select)
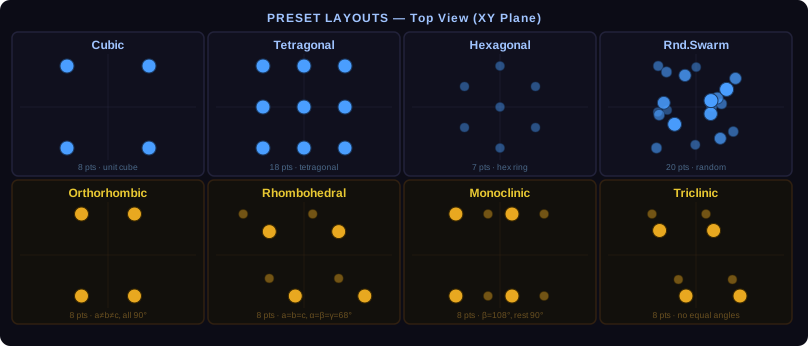
Eight preset buttons appear at the very bottom of the window. Each clears all current instances and places new ones. Buttons 1–4 (teal) are abstract motion layouts; buttons 5–8 (amber) are crystallographic unit-cell shapes.
| # | Preset | What it creates |
|---|---|---|
| 1 | Cubic | 8 instances at the corners of a unit cube. Each corner oscillates toward the centre (0, 0, 0) and back in Pingpong mode — a “breathing cube” effect. |
| 2 | Tetragonal | Grid with equal XY spacing and different Z spacing |
| 3 | Hexagonal | 2D hexagonal ring tiled along Z (mirrors typical dome layouts) |
| 4 | Rnd.Swarm | 20 instances scattered randomly within a sphere |
| 5 | Orthorhombic | Unit cell with three unequal orthogonal axes (α=β=γ=90°) |
| 6 | Rhombohedral | Unit cell with equal axes and equal non-orthogonal angles (α=β=γ≠90°) |
| 7 | Monoclinic | Unit cell with one inclined axis (α=γ=90°, β≠90°) |
| 8 | Triclinic | Unit cell with no equal axes and no right angles — maximum asymmetry |
13. First session walkthrough
Start here. This walkthrough takes about five minutes and covers the core workflow. No prior knowledge of the parameters is needed — the Cubic preset is loaded automatically when you click Reset.
Step 1 — Apply a preset
Click Cubic in the status bar. Eight instances appear in the lattice preview, one at each corner of a cube.
Step 2 — Start motion
Set Speed to ×1.00, make sure BPM is off. The instances are moving — watch the step counters in the instance list increment.
Step 3 — Adjust direction
In the parameter panel, select instance 1. Set Offset X = 0.02, Offset Y = 0.01, Offset Z = 0. This instance now drifts diagonally in XY.
Step 4 — Bounce with Pingpong
Set Mode = Pingpong and Steps = 64. The source travels 64 steps out and bounces back. Repeat for other instances with different offsets.
Step 5 — Add global drift
Drag the Move X slider in Row 3 slightly to the right (e.g., 0.008). The entire crystal now drifts rightward while individual instances still bounce within it.
Step 6 — Rotate the crystal
Drag the Yw (Yaw) slider in Row 4 to spin the whole crystal around the vertical axis. Combine Pt and Rl for compound orientations. The lattice preview updates in real time.
Step 7 — Connect OSC
Enter your AmbiEncoder host and port in Row 1, then click Connect. Positions are streamed as OSC messages to the encoder in real time. After connecting, in: 9002 appears — this is the port for incoming rotation control (see §11).
14. Import crystal structures
Kristall can load a real crystal structure from a CIF file and turn its atoms into instances — a bridge from crystallography to spatial sound. Two buttons at the bottom of the instance list handle this:
| Button | Action |
|---|---|
| COD | Opens the Crystallography Open Database in your browser, pre-filtered to Acta Crystallographica Section E (small structures that fit the 64-instance limit). |
| CIF | Opens a file dialog to import a downloaded .cif file. |
Workflow
- Click COD — your browser opens the database. Pick a structure and download its
.cif(each entry has a CIF link). - Back in Kristall, click CIF and select the downloaded file.
- The atoms of the asymmetric unit are loaded as instances: positions are computed from the fractional coordinates and unit cell, then centred and normalised to fit the preview. Each instance is named after its atom label and coloured by element (CPK-style: C violet, N blue, O red, F/Cl green, H light, metals in warm hues).
Imported atoms are static by default (Offset = 0) — a still snapshot of the structure. Add motion afterwards with global Rotation (Row 4) to spin the whole crystal, Move (Row 3) to drift it, or a per-instance Offset to step atoms through space. Only the atoms listed in the file (the asymmetric unit) are imported — no symmetry expansion — and structures with more than 64 atoms are capped, with a note in the status bar.
15. Troubleshooting
Sources do not move. Check that Speed > 0 and that the instance is Enabled. In BPM mode, REAPER transport must be running.
All instances are at the same position. Apply a preset (e.g., Cubic) to distribute them, or set unique Start positions manually.
Positions drift outside the speaker array. Mode is set to Infinite with a non-zero Offset. Switch to Pingpong, or enable Bounds with Mirror mode.
Move slider changes are too coarse. Drag slowly — the slider covers the full −2 to +2 range. For fine control, click the slider to enter a numeric value, then press Enter.
OSC not connecting.
Verify that the Python OSC bridge is running (python-osc required). Check host IP and port. The status dot turns green on a successful connection.
OSC not connecting on Windows.
Three things to check: (1) Python must be in the system PATH — reinstall Python and tick “Add Python to PATH” if missing. (2) Windows Firewall may show a popup the first time Python opens a UDP port — click “Allow access”. (3) If the status dot turns green but no movement occurs, make sure the AmbiEncoder host IP is 127.0.0.1 for a local connection.
OSC input (rotation) has no effect.
The OSC bridge must be connected first (output port active). Check that your controller is sending to output port + 1 (default: 9002), not 9001. Confirm the messages arrive with a UDP monitor (e.g., Protokol).
Stop button does not pause — it starts playing. Update to the latest script (v2.4.0) — this was a bug in early pre-release versions.
See also
- ICST Ambi Motion Map — step-based 2D/3D motion shapes
- OSC Reference — AmbiEncoder OSC format and coordinate system
- Downloads — script downloads